here's a phpWCMS Quick Start Guide *IMAGES FIXED*
Posted: Tue 13. Jul 2004, 22:43
For those of you that are having trouble getting started with phpWCMS, I sympathize and offer my own notes:
---------------------------------
phpWCMS Quick Start
---------------------------------
Please Note: phpWCMS does not have pre-installed template 'skins' to quickly change the look of your site. You have to do some HTML design work to create a phpWCMS site. This is both a curse and a blessing. phpWCMS is very flexible and powerful from a design point of view, but you must put in a little time up front.
This tutorial assumes you have a working installation of phpWCMS 1.1 RC4.
The basic steps of site development using phpWCMS:
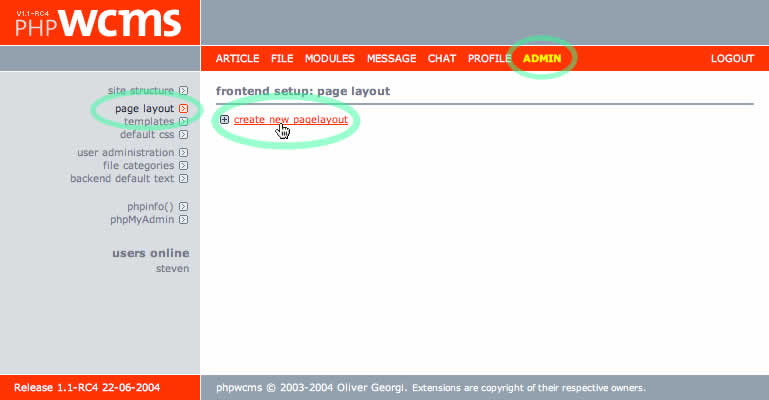
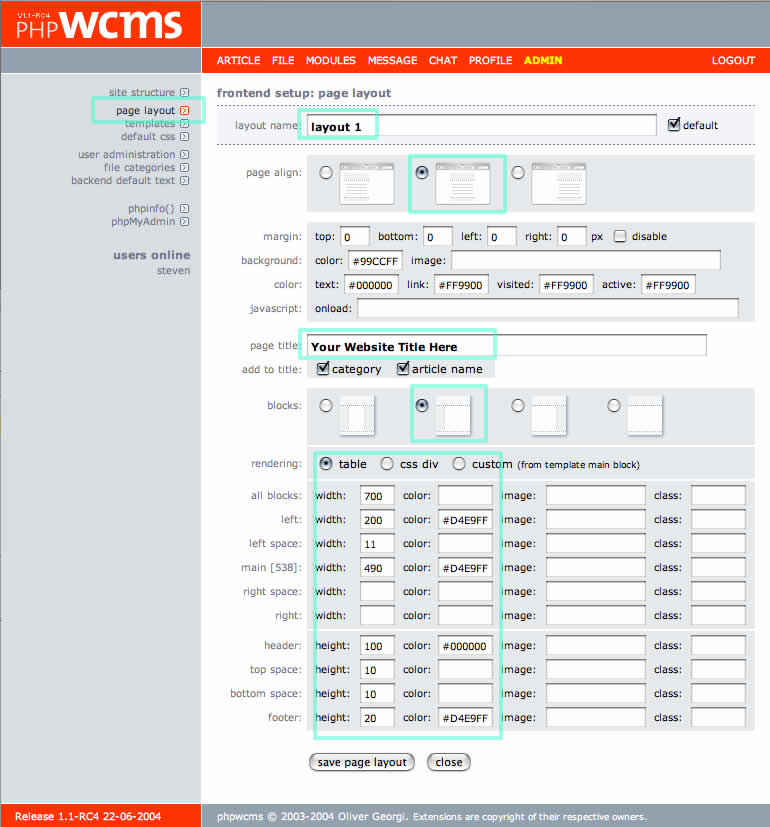
1) Go to the Page Layout area and create a Page Layout to define the very basic page areas or blocks. For this example define a Page Layout that includes a left column (for navigation). Look at these page examples:
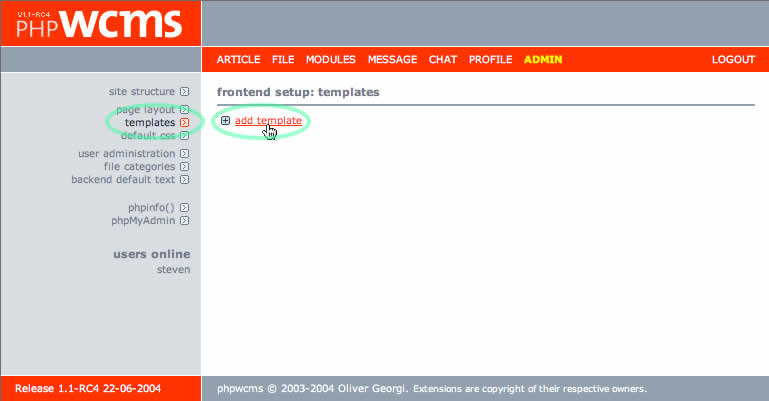
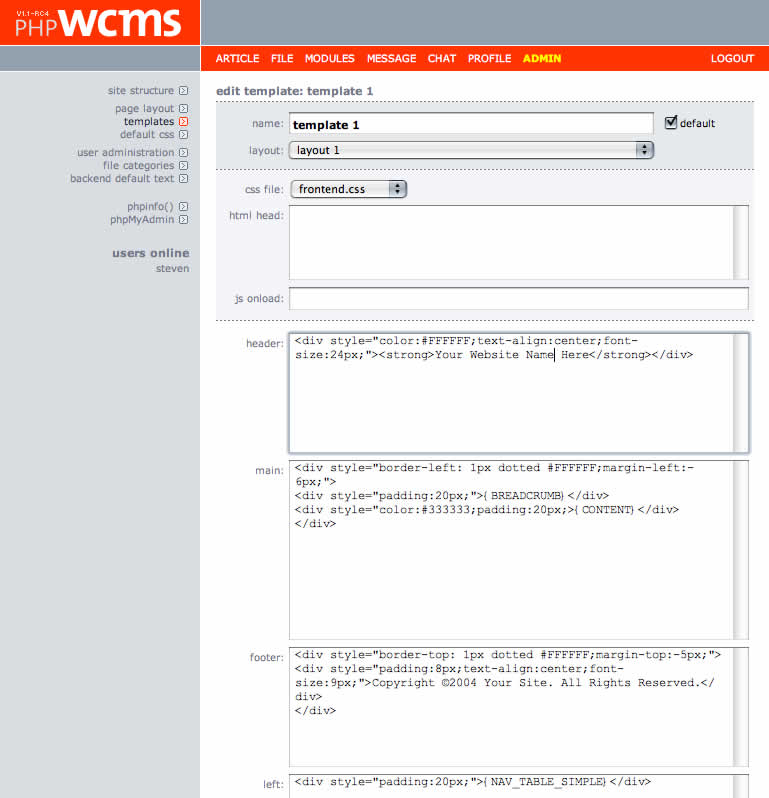
2) Go to the Template area and create a Template to contain the actual HTML code for your pages. (Templates rely on the Page Layout for their basic structure, typically a table). You can add as much HTML or CSS as you want here--remember the areas you see here are just containers for your HTML code. Next, tell phpWCMS where to render some content using what are called Replacement Tags (this is the fun part): at a very minimum, enter the {CONTENT} and the {NAV_TABLE_SIMPLE} Replacement Tags* into any Template areas along with your HTML code. These will render your articles for a particular site area along with some simple navigation. Look at these page examples:
3) Go to the Site Structure area and create a Site Structure level (AKA category) and associate that with a specific Template using the drop-down menu there. Look at these page examples:
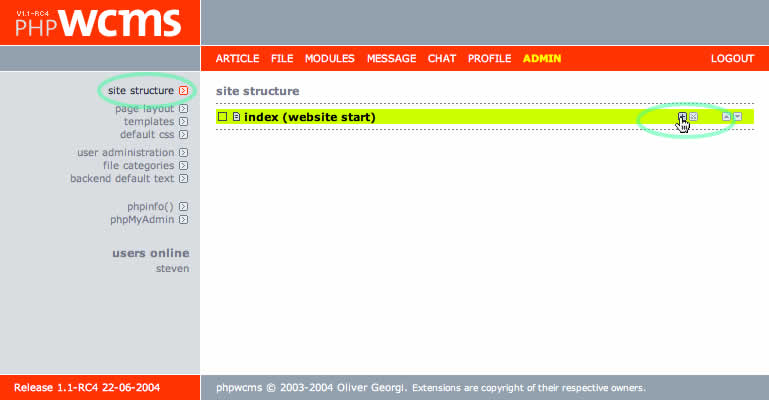
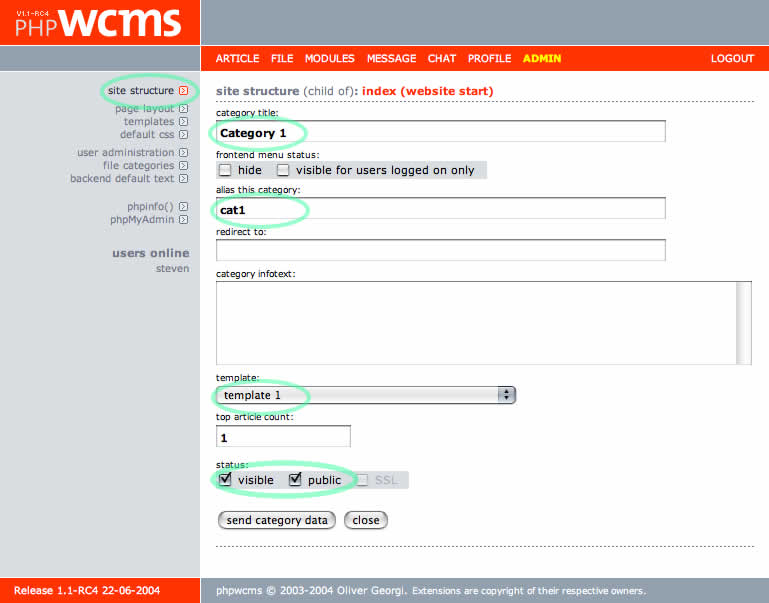
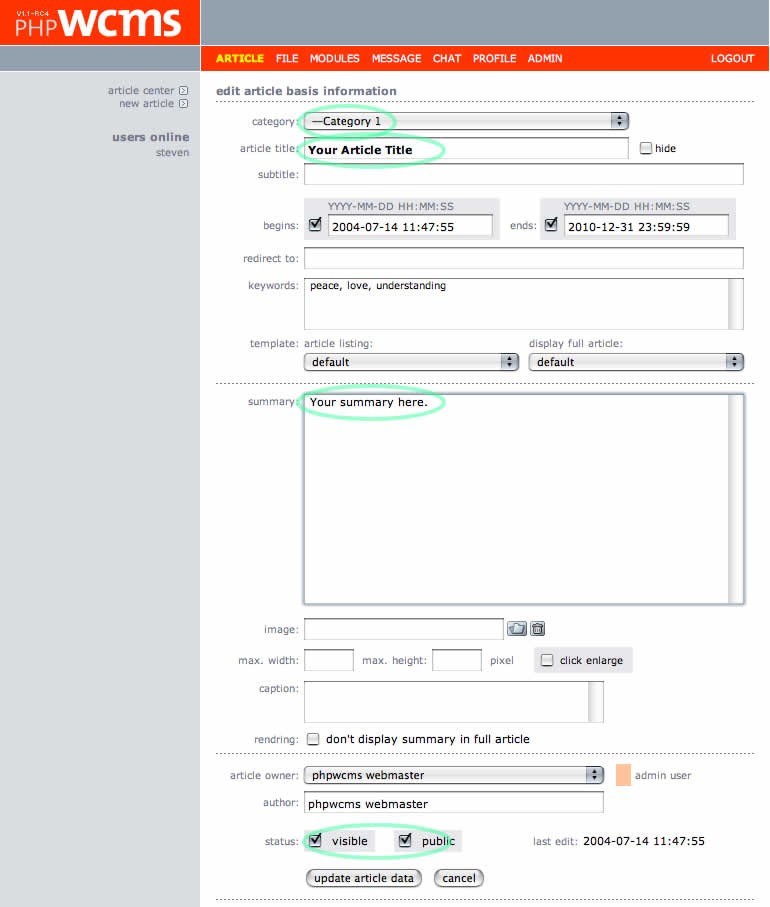
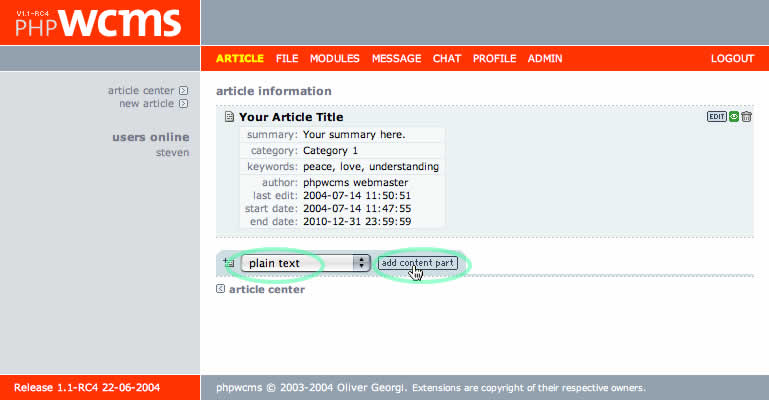
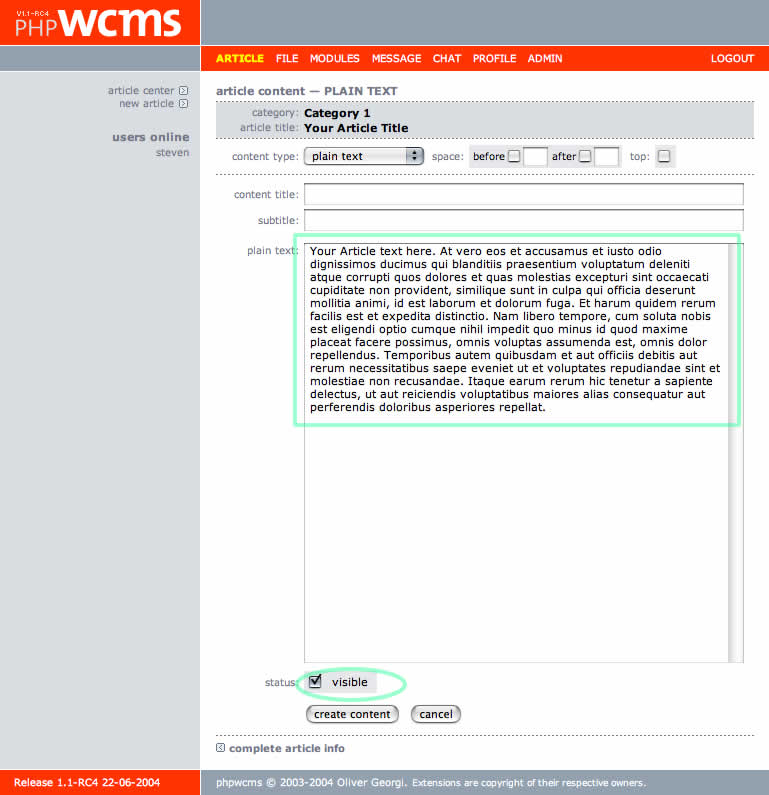
4) Go to the Article area and create Articles within a given Site Structure level. Use Content Parts to add content and control the visual presentation of that content. Experiment with different Content Parts to see how they work. The articles will be immediately visible as a list (or single article if only one exists) on the page that you have assigned to that Structure level. Follow these page examples:
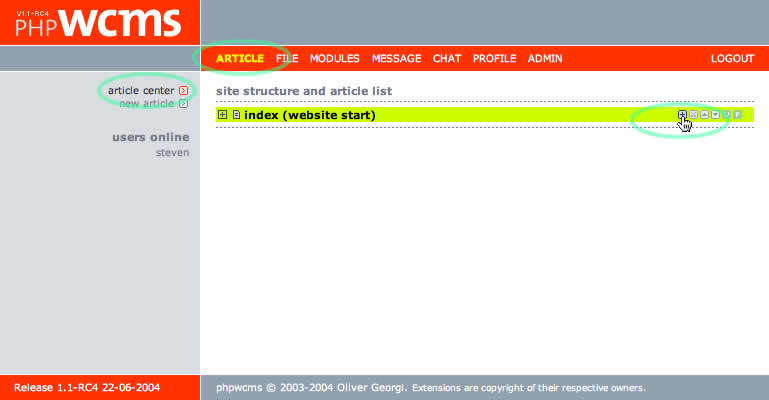
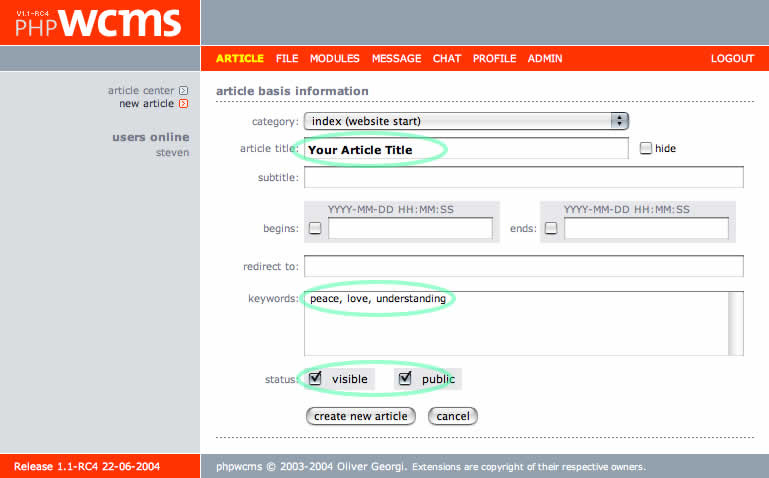
Next create another article and associate it with your home page.
Preview your site--it should look like this:
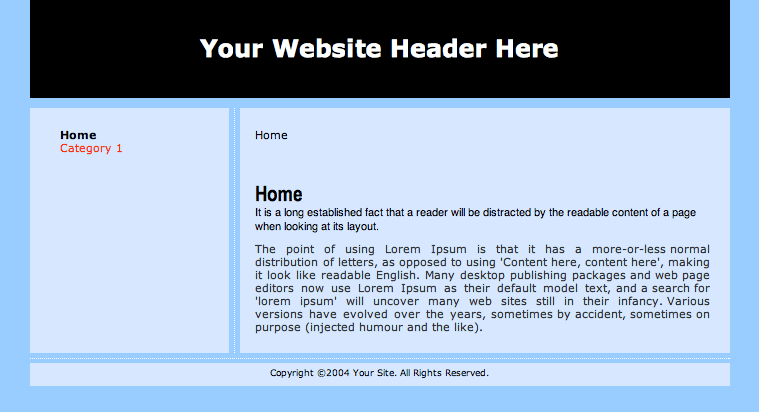
if you followed the example you will see that the site looks very simple. At this point you will want to go back and add your own HTML/CSS to the Template. It's easiest to create a page design in Dreamweaver (or other WYSIWYG editor) and then cut/paste the code into the Template blocks.
Make sure you check 'visible' and 'public' in each area of the Admin interface or else you will end up with blank pages.
--------------------------------
*More detail about Replacement Tags:
http://docu.fhss.de/replacement_tags_en.shtml (courtesy of Pappnase)
S.
---------------------------------
phpWCMS Quick Start
---------------------------------
Please Note: phpWCMS does not have pre-installed template 'skins' to quickly change the look of your site. You have to do some HTML design work to create a phpWCMS site. This is both a curse and a blessing. phpWCMS is very flexible and powerful from a design point of view, but you must put in a little time up front.
This tutorial assumes you have a working installation of phpWCMS 1.1 RC4.
The basic steps of site development using phpWCMS:
1) Go to the Page Layout area and create a Page Layout to define the very basic page areas or blocks. For this example define a Page Layout that includes a left column (for navigation). Look at these page examples:


2) Go to the Template area and create a Template to contain the actual HTML code for your pages. (Templates rely on the Page Layout for their basic structure, typically a table). You can add as much HTML or CSS as you want here--remember the areas you see here are just containers for your HTML code. Next, tell phpWCMS where to render some content using what are called Replacement Tags (this is the fun part): at a very minimum, enter the {CONTENT} and the {NAV_TABLE_SIMPLE} Replacement Tags* into any Template areas along with your HTML code. These will render your articles for a particular site area along with some simple navigation. Look at these page examples:


3) Go to the Site Structure area and create a Site Structure level (AKA category) and associate that with a specific Template using the drop-down menu there. Look at these page examples:


4) Go to the Article area and create Articles within a given Site Structure level. Use Content Parts to add content and control the visual presentation of that content. Experiment with different Content Parts to see how they work. The articles will be immediately visible as a list (or single article if only one exists) on the page that you have assigned to that Structure level. Follow these page examples:


Next create another article and associate it with your home page.
Preview your site--it should look like this:

if you followed the example you will see that the site looks very simple. At this point you will want to go back and add your own HTML/CSS to the Template. It's easiest to create a page design in Dreamweaver (or other WYSIWYG editor) and then cut/paste the code into the Template blocks.
Make sure you check 'visible' and 'public' in each area of the Admin interface or else you will end up with blank pages.
--------------------------------
*More detail about Replacement Tags:
http://docu.fhss.de/replacement_tags_en.shtml (courtesy of Pappnase)
S.